A DELICIOUS SUMMER BEVERAGE – hold the alcohol please!

photo 2-10

A week ago yesterday I decided that I’d try to see how long I could go without drinking alcohol. I knew it was important to have a goal date to work towards, so I chose my best friends wedding on May 17th. Did I think I could go three weeks without alcohol? I knew it was possible, but it’d be very challenging. What really motivated me to go for it was when I asked Blaine if he thought I could do it and he said “No.” Well, that was just fuel for the fire – motivation.

I’m one week in and I have had three challenging opportunities to drink, yet I chose not to (no I’m not pregnant). For me, it’s when I’m out to dinner, brunch, or even relaxing at home watching sports that I’ll want to have a glass of wine or a hard cider. So I’ve made it one week and I only have two more to go.

Another reason why I chose to go without alcohol for a three-week time period is because I wanted to see how it affected my body – physically and mentally. I believe that if you can stick to something for a week, it can become a habit.  I guess we will find out within the next two weeks how things will go. The down side to this experiment is that when I do go to drink at this wedding, my tolerance won’t quite be where I’d like it to be.

Sunday, May 4th was a beautiful day and Sundays in Minnesota paired with sunshine usually equal Sunday fun day and Sunday fun day usually equals lost of alcohol. Being I am abstaining from alcohol, this means no delicious mimosa, mouth water bloody Mary, or even my favorite refreshing glass of Sauvignon blanc. Ugh – why am I doing this!? Oh yeah, that’s right – because it’s easy to give in and it feels better to say no thank you! It’s not that I’ll never be able to indulge in a Sunday fun day again, but here’s the thing – I know there will be plenty of opportunities this summer for drowning in some heavenly summer cocktails and glasses… Or bottles of wine. For now, I just want to prove to myself it’s okay to say I choose not to.

“I CHOOSE NOT TOO” – try it verses “I CAN’T” because honestly, it’s not that I CAN’T have a glass of wine, it’s because I’m choosing not to – for the time being.  If I CHOSE to grab for that un open bottle of wine and indulge in a glass as I lay in bed writing this, I’d still wake up tomorrow alive.  “I’M CHOOSING NOT TO.”

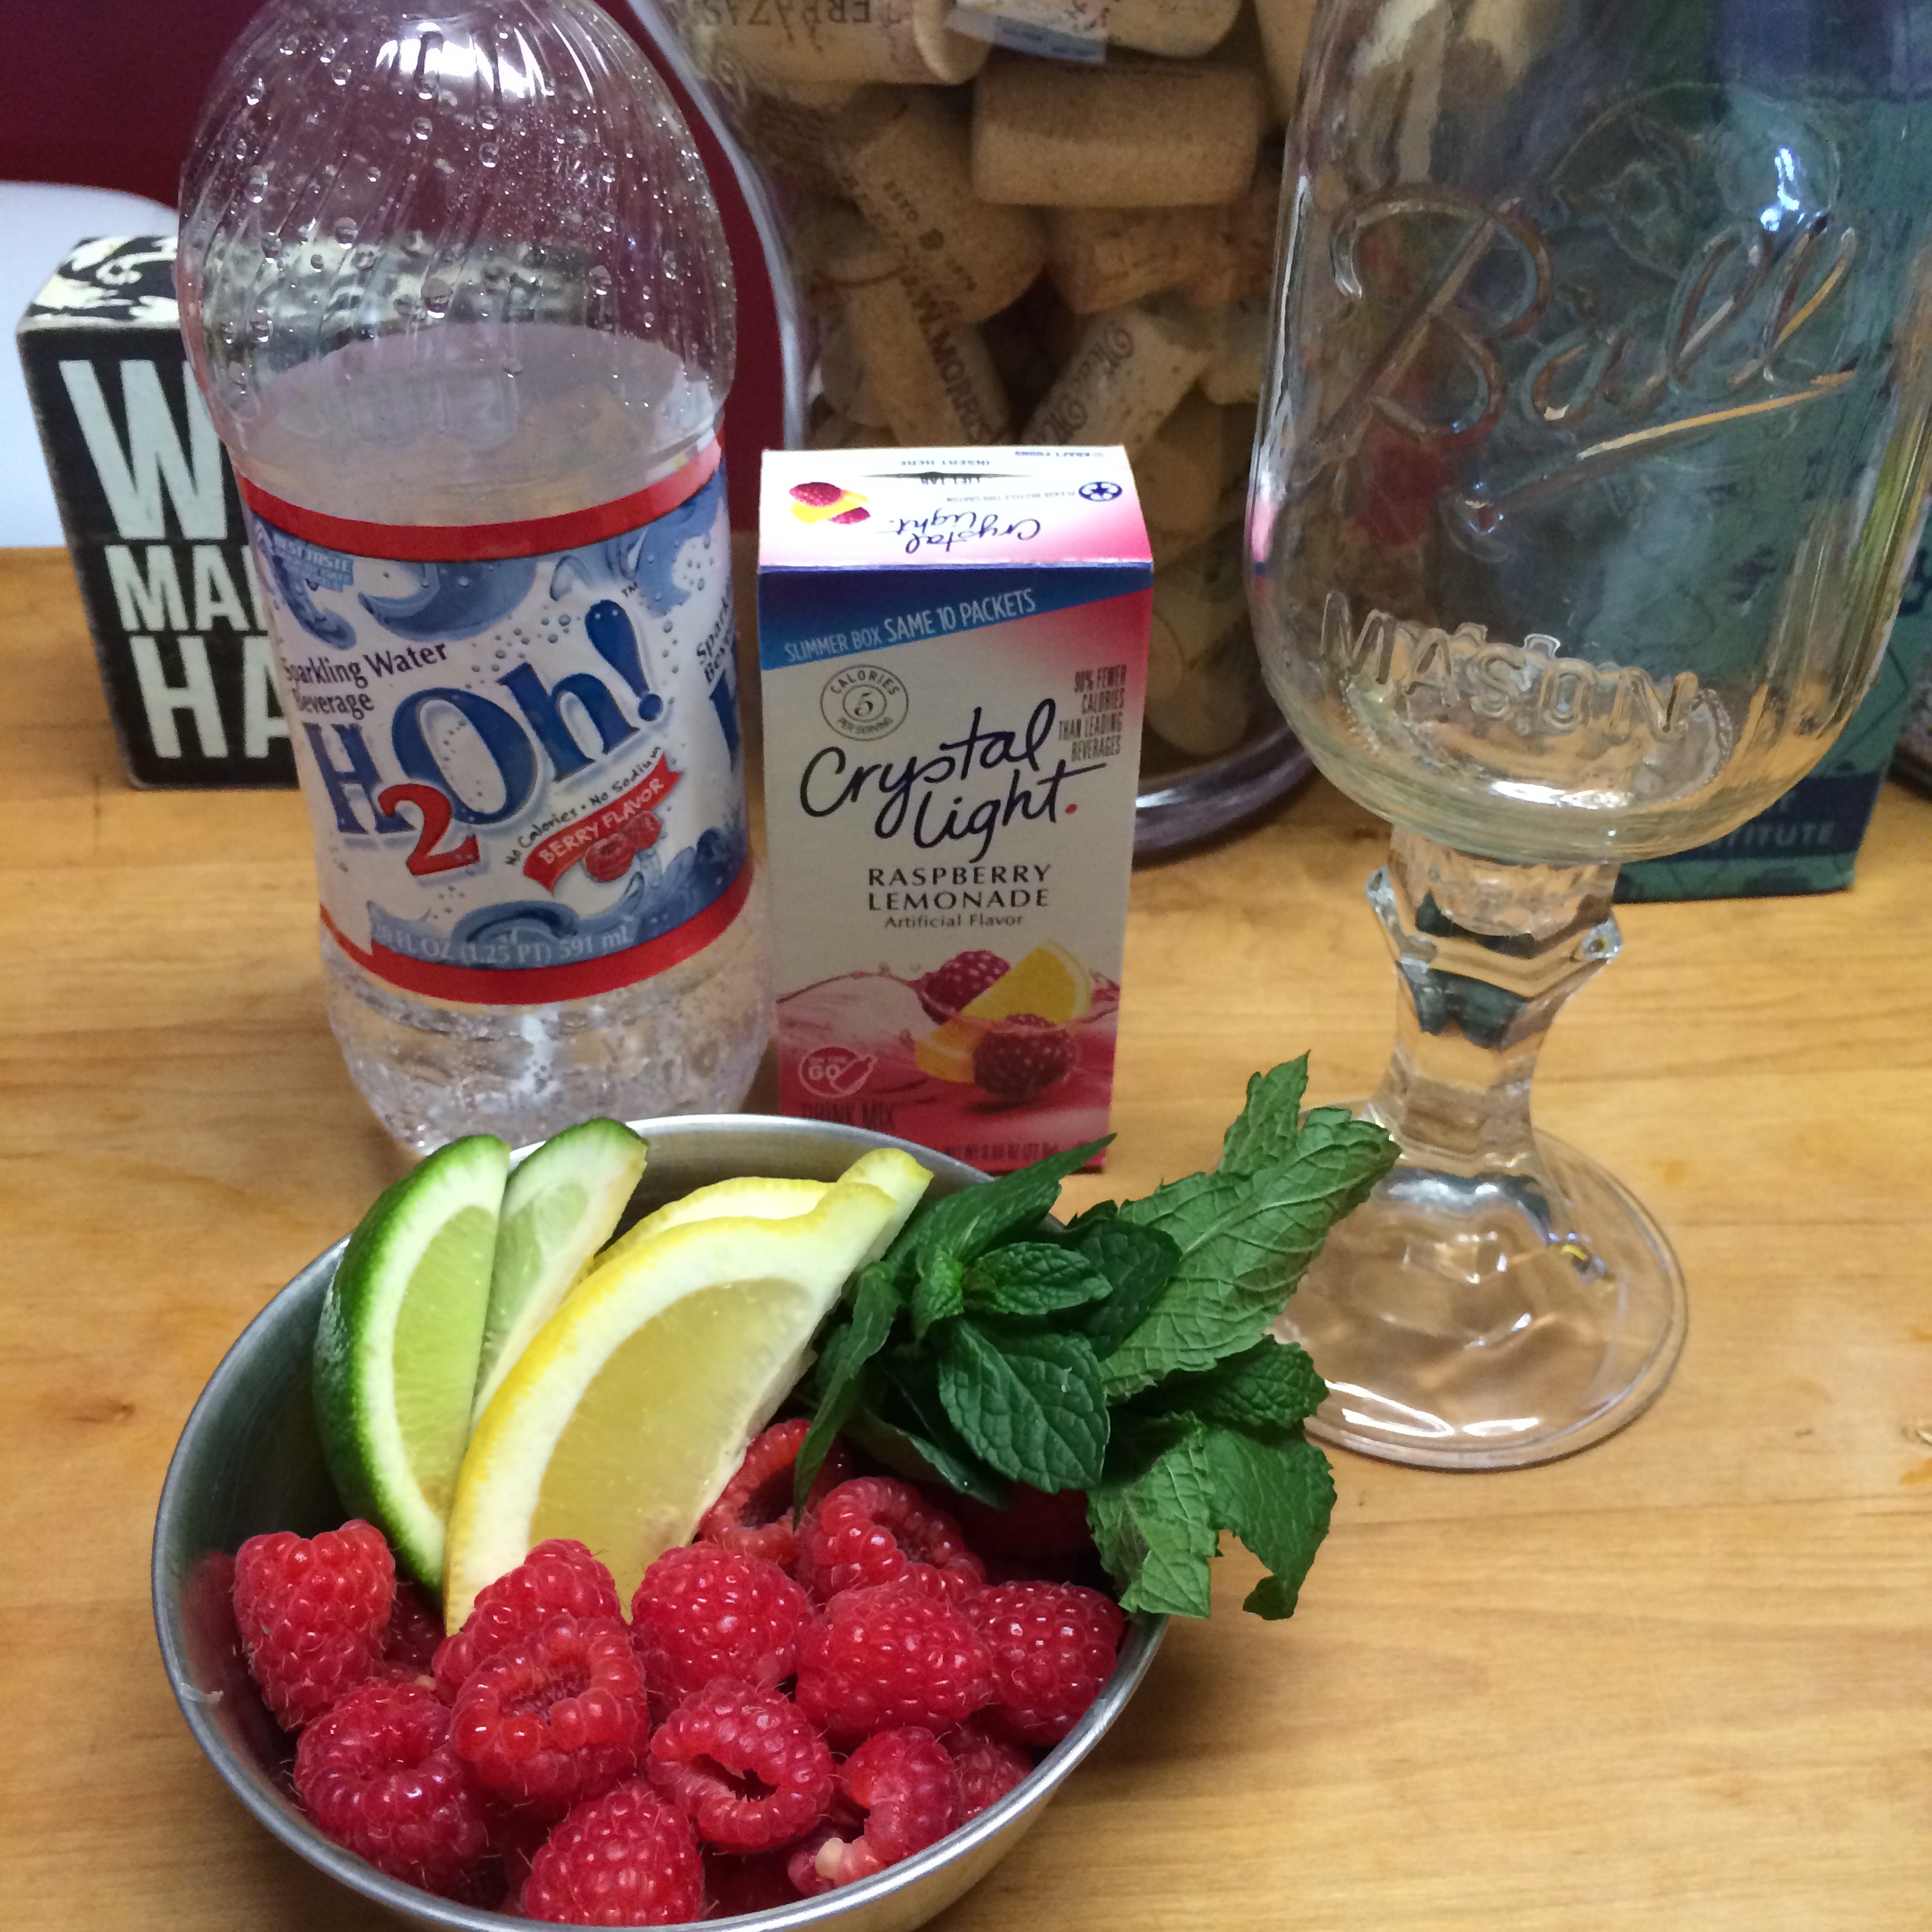
So yesterday on my way home from a fabulous morning with friends at the MPLS Farmers Market and brunch to follow, I hadn’t had a drop of alcohol and was itching for a refreshing summer drink, what with the sunshine pouring down that day and all. I decided to stop at the grocery store and grab some fresh and low-calorie ingredients to mix up something to Moc what I was craving, but of course without the alcohol. This concoction essentially turned into a virgin raspberry lemonade mojito.

I challenge you to try this recipe out and see if you could go with out alcohol in your cup every time!

INGREDIENTS

(will vary depending on your fruit choice)

  • Lime wedges
  • Lemon wedges
  • Crystal light – raspberry lemonade or whichever flavor sounds yummy to you
  • Fresh raspberries or fruit of your choice
  • Fresh mint
  • Soda water – I used raspberry flavored

photo 1-12

DIRECTIONS

  1. Wash your fresh fruit
  2. Slice your lemons and limes
  3. fill a glass of your choice with ice, top with your fresh fruit and mint, cover with your flavored soda water and a packet of your water flavoring.
  4. Mix together and simply enjoy

photo 1-11

PLANTING SUCCULENTS IN TEA TINS

photo 4-3

I’ve written a lot about food, and food I love, but there are many other things that bring me joy in life.  One of which is the ever-so-beautiful succulent plant.  What are succulents you ask?  Well, succulents are exactly what they’re called – succulent.  They are a plant similar to the cactus, and contain water within their leaves. making them “succulent.”  I have come to love these succulent plants, or as Blaine would say, am obsessed with them.  I have learned, through trial and error how to properly care for these plants and plan to share with you today some of the tips n tricks I have learned.

Tuesday I went to town planting succulents, what with it being Earth Day and all.  It seemed very appropriate to get down and dirty with some potting soil and a variety of succulents on a beautiful day like it was.  Lately, I’ve had the itch to plant succulents in tea tins and after planting one and posting a picture on Facebook, I received a lot of great feed back on how neat it was.  I decided to pant succulents in the rest of the tea tins I had lying around.

Just incase you’d like to try this yourself, I will go through the motion of planting succulents in tea tins and include all the tips n tricks I have learned along the way.

 WHAT YOU WILL NEED

  • Some sort of tin or pot.
  • A succulent of your choice.  You can find them at almost any home improvement store.  I got mine at both Home Depot and a local green house.
  • Soil.  I also got my soil from Home Depot. The kind you want to look for is a moisture control soil to help very easy drainage.  They have soil at Home Depot specifically for succulents and cacti.
  • Rocks of some sort.  I used small river rocks that I purchased from Home Depot, but you could also go right outside and find some small ones I’m guessing.
  • Perlite.  This also helps increase drainage for the succulents. (not 100% necessary)
  • Sheet Moss.

photo 1-9

STEP – BY – STEP HOW TO PLANT YOUR SUCCULENTS

  1. First place about an inch layer of rocks on the bottom of your tea tin or potphoto 3-8
  2. Next, mix together a little of the potting soil and the perlite in a bowl.photo 1-8
  3. Once soil and perlite are mixed, place a small layer over the rocks.  You do not need a lot because you will have to use some of the soil attached to the succulent.photo 2-7
  4. Now it is time to transfer your succulent to your tin or pot.  The easiest way to take your succulent out of the temporary pot is to squeeze the sides to loosen up the soil.photo 3-7
  5. Place the succulent into the tin, gently.  I tore off a little of the bottom roots in order to make the succulent fit into the tin.  It may not fit in the tin completely, but I then take a gardening tool or you could use a knife or fork to shove the plant down into the tin.photo 4-4
  6. Once your succulent is nicely situated into the tea tin, take your sheet moss and stuff it into the corners and edges of the tea tin to hide the soil.photo 5-4
  7. Once finished with the moss, you have now completed your succulent tea tin!  photo 2-6

TIPS N TRICKS

WATERING YOUR SUCCULENT: 

This is one area where I have learned my lesson with succulents.  Succulents are made to survive in dry climates, therefore they do not need a lot of water.  How you know when to water them is when the soil is completely dried out.  Sometimes this is hard to tell, but I’d say about every other week.

Seasons do matter!  When I say to water your succulents every other week, I’m talking about in the spring and summer. These are the months where they are blooming and thriving.  Throughout the winter months they rarely need any water at all – roughly every other month. If you’re OVER WATERING, your succulents will be soft and discolored and the leaves yellow and white.  If UNDER WATERING, your succulents will stop growing and shed their leaves.

PROVIDING LIGHT FOR YOUR SUCCULENT:

What I have found with my succulents is that if they are not getting adequate light, they will start to reach for the light, creating long stems and spaced out leaves.  This is called etiolation or reaching. To prevent this, provide better lighting – preferably a south-facing window, somewhere where they won’t receive too much light and be scorched by the mid day sun. Plain and simple, succulents won’t do will in a room with no windows either.

I hope you found this informational if you have your own succulents or maybe even inspirational and will want to start your own succulent collection.  I made quite a few succulent tea tins, so if you’re interested let me know!

CHOCOLATE, PEANUT BUTTER, APPLES – OH MY!

photo 4-5

Do you like chocolate?  If so, do you also like peanut butter (who doesn’t!)? Last question, do you like apples?  If you have said to all three, you will LOVE this quick and healthy little snack I came up with today.  Because this snack is so quick and easy, I’m going to keep this post short and sweet.

3 SIMPLE INGREDIENTS

  • Chocolate rice cakes
  • 1 tbsp peanut butter
  • 1 small green apple

DIRECTIONS

  1. First, ALWAYS wash your fresh fruit!
  2. For the next step, you will need a corer, otherwise you can cut up the apples however you please.  After you have washed the apple, use the corer to take out the core.  Now that you have the core taken out, slice you apples horizontally to make thin slices.  I used my mandolin for this to help get consistent slices.
  3. spread 1 tbsp of peanut butter over your chocolate rice cake.
  4. Place sliced apples on top and ENJOY!

photo 1-10

photo 2-9

photo 3-9

HAVE YOUR PIZZA AND EAT HEALTHY TOO!

photo 1-6

As you may have noticed by now if you follow me on Facebook or Instagram, I love food. I always look for an opportunity to plan a new healthy recipe or try out a new restaurant where I can indulge in a “cheat” meal. Well, this past Friday I ended up trying out a new healthy recipe at home: cauliflower pizza crust.

Being a weight loss consultant, I often suggest this recipe as a yummy, feels like I’m cheating kinda meal for my clients because using cauliflower rather than regular high carb pizza crust can save a lot of calories – or in other words – you get more bang for your buck.

This past Friday, a good (GREAT) friend from high school was coming over to chat and simply hang out – some of the best nights consist of this kinda hanging out. We decided to stay in and cook something our selves – and oh – save some money of course. She left the recipe deciding up to me and I decided to take the healthy route, what with Easter this weekend and all the ham that would eventually be consumed – oops! Reyan was totally cool with whatever I chose and was super open to whatever ingredients I chose for the pizza – what and “easy” friend 😉

Now I know that not everyone likes cauliflower pizza crust, but then again not everyone likes our president either (I know, not relevant haha). So if I had to run some stats on is recipe it’d be this:

Friday night there were 5 people in our house
5 people tried the pizza
4 out of 5 people enjoyed the pizza
(Of course my dad was the one who wasn’t so impressed)

I dare you to stray from your Pizza Hut, Dominos, or Jacks frozen pizza for one day and attempt this delicious, yet nutritious cauliflower pizza crust recipe that is extremely simple!

INGREDIENTS

  • 1 egg
  • 1 cup part skim mozzarella
  • Seasonings of choice – red pepper flakes, mrs dash, etc

photo 2-5

DIRECTIONS

  1. Preheat oven to 450 degrees Fahrenheit.
  2. Cut and clean head of cauliflower and dry.
  3. Place part of the cauliflower into food processor and pulse on high until fluffy like snow. Continue to pulse the rest of cauliflower. photo 4-2
  4. Place cauliflower in microwave safe bowl, cover with plastic wrap and microwave for 2 minutes.
  5. Once cauliflower has sat for a few minutes to cool, place cauliflower in clean dish towel and ring out water in separate bowl until most (almost all) water is gone.photo 3-5
  6. Mix egg, seasonings and cauliflower together until all blended.
  7. It is easiest to use parchment paper, but you may also use a cookie sheet. Spray parchment paper or cookie sheet and flatten out crust into shape of choice. I made two circular pizzas out of the dough I had.
  8. Cook pizza crust until golden brown edges, roughly 18-20 minutes.
  9. Once crust is cooked, take out of oven and place ingredients on top and cook until cheese is melted. (if you are using meat or mushrooms, cook ahead of time).

You can choose whatever pizza toppings you’d like! We chose to do a margarita pizza and the ingredients included:

Sliced grape or Roma tomatoes
Fresh basil
Mozzarella cheese

photo 5-2

My suggestion when using cauliflower crust is to not heap on the ingredients too much.

I hope you enjoy this delicious and healthy alternative to your average pizza.

“HEALTH-IER” BANANA CHOCOLATE CHIP COOKIES (5 ingredients)

photo 1-5

Alright, raise your hand if you like chocolate chip cookies.  Now raise your other hand if you like banana bread.  If both of your hands are in their air, you’ll love this simple and quick recipe for chocolate chip banana cookies, only using five ingredients.

This recipe was originally found on Pinterest, but I modified it and added a 5th ingredient.

INGREDIENTS:

  • 2 ripe bananas
  • 1/2 cup chocolate chips (If you want to make it even healthier, choose dark chocolate chips for a little extra antioxidants)
  • 1/2 cup quick oats
  • “Heaping” tablespoon of peanut butter (OPTIONAL – does add more fat)
  • 3 tablespoons Splenda or alternative sweetener (I added this ingredient)

DIRECTIONS:

  1. Preheat oven to 350 degrees
  2. Measure out all ingredients and mix together
  3. Drop a spoonful of dough onto greased cookie sheet
  4. Cook for roughly 10 minutes (Look for golden brown edges)
photo 2-4

I only had 1 banana, so I split this recipe in half – hence the small amy of chocolate chips

photo 3-4

These cookies turned out delicious and a combination of chocolate chip cookies and banana bread.  Super easy and makes roughly 16 cookies depending on the size.  If you have a sweet tooth you will most definitely benefit from this low calorie treat! PLUS, this recipe requires only 5 ingredients, a spoon, and a pan – no blender, flour, eggs, butter, or mountains of sugar.

* If you chose not to add the peanut butter, your cookies would essentially be “FAT FREE.”

PROTEIN WAFFLES from a friend

Social media has many negatives, but with it soooo many positives.  Think about how many relationships are created, how many jobs are acquired, and how many people are inspired just by what they see on Facebook, Instagram, Linkedin and other social media outlets.  My goal is to achieve inspiration through these powerful outlets (Facebook, Instagram, Blogs, etc).  Many people may not like how often I post a picture of my food or status about striving for a healthy lifestyle and that’s quite alright.

“You can be the ripest, juiciest peach in the World, and there’s still going to be somebody who hates peaches.” – Dita Von Teese

Recently I have been more involved with changing my own lifestyle and making healthier choices and posting my progress or thoughts on these social media outlets.  As a result, I have gotten so much POSITIVE feedback from family, friends, and coworkers.  A friend told me the other day: “You have definitely found your career.”  This felt AMAZING!

Now, I know I’ve come across many who do not like “peaches,” but all of this POSITIVE feedback over powers the NEGATIVE.  This is my passion, like it or leave it.

With that said, this post today is derived from an inspiring post on a friend’s Facebook wall.  I am also a bartender by (FRIDAY) nights to earn a bit of extra cash (RENT).  A coworker/friend/bartender I often work with is a very determined young lady who puts her health and fitness as a high priority (LOVE)!  She recently posted a picture of her protein waffles and I just HAD to have the recipe for my post workout meal. (PLUS, I love trying new – healthy – recipes).

I was bartending last Friday night (Lauren had off) and she ended coming in for a few cocktails.  I told her I NEEDED that recipe!  I handed her a “bev” napkin and a pen and she wrote down the recipe for me.  I was so excited for this scribble-scrabble, napkin recipe.

photo-6

Today I finally got a chance to try it out after my leg workout.

INGREDIENTS:

photo 2-3

  • 1 scoop vanilla protein powder (I used EAS)
  • 1/3 cup oats
  • 1/2 cup Almond milk
  • 1 tbsp stevia or Splenda
  • 1 egg white
  • I also added cinnamon

OPTIONAL:

  • 1/4 cup blueberries (or fruit of choice)
  • Cinnamon

photo 3-2

DIRECTIONS:

Pretty simple – I just added everything together and stirred. Obviously, I then used my waffle maker and let the waffle maker tell me when it was done.

photo 1-3photo 2-2

Now these waffles aren’t quite the same consistency of “regular” waffles, BUT are loaded with protein!  I hope I have possibly inspired you to try a different, healthier waffle recipe!

photo 3-3

MORE SPAGHETTI SQUASH: A quick and easy substitute for chicken fettuccine alfredo

1899942_10201567850379813_282154715_n

Hey guys! I apologize that it’s been a while since I’ve last posted.  I will keep it short and sweet just like the recipe I’m about to share.

So once again, it is a Monday night – 1. Ashley is staying over 2. The Bachelor Finale is on 3. I get home 10 minutes before it starts.  This means that I need to prepare something quickly so that Blaine doesn’t have to wait too long to watch Juan Pablo chose his bride.

I’ve found that spaghetti squash is not only a delicious alternative to pasta, but it is also very quick to make.  You can cook spaghetti squash very easily in the microwave.

SPAGHETTI SQUASH via microwave

  1. Cut spaghetti squash in half
  2. Clean out “guts” of spaghetti squash
  3. Rub with olive oil, salt, pepper, or Mrs. Dash
  4. Microwave for roughly 10-15 minutes
  5. Fork out spaghetti squash and set aside

Today I got home around 6:40 and Blaine had already cooked the spaghetti squash for me. (If you know Blaine, this is a HUGE step outside of his box – a step that I very much appreciate! – baby steps).  All I had to prepare was the chicken and microwave some peas (or vegetable of your choice).  Alright, here’s what you will need:

INGREDIENTS

  • 1 spaghetti squash
  • 1 table-spoon of butter or canola oil
  • Minced garlic
  • 1/2 jar of alfredo sauce
  • Frozen steamed vegetables of your choice
  • 2-4 boneless, skinless chicken breast
  • (Blaine suggested I add onions)

DIRECTIONS

  1. Clean and prepare your spaghetti squash and cook in microwave for 10-12 minutes.
  2. While your spaghetti squash is cooking, grill or pan fry your chicken breast (season to your taste).
  3. In a large skillet heat oil or butter with minced garlic and onions on medium.
  4. Once spaghetti sauce is cooked, fork spaghetti squash out and add to skillet.
  5. Now that the microwave is free, steam your vegetable of choice and when finished, add to skillet.
  6. After the chicken is fully cooked, dice and place in skillet.
  7. Finally, add some of your alfredo sauce and stir. (LESS IS MORE!)

I know I’m a little obsessive with spaghetti squash, but hey, it’s good!  I hope you try this recipe out and maybe even mix it up with your own veggies or protein!

ENJOY!

TWO SISTERS MAKING TACOS

1016799_10200277011069637_1063588933_n1901488_10201468490215871_517014785_n

For those of you who do not know me, it’s important before reading this blog that you know I have a little sister who is a year and a half younger than I am.  Her name is Ashley Rae Crapser, AKA – Hashley Rae or Hash Brown.  She is a very important part of my life and we have shared many hair-pulling, temper tantrum, agree-to-disagree moments together as well as many joy-filled memories up at the lake, on Christmas morning, and on the same campus at St. Catherine’s University where we both completed our college degrees.

It may look like sometimes I’m an “okay” cook, but my sister also has a few culinary skills  herself.  The real skill Ashley has is in baking.  Her baking has been so popular with our friend’s and family she’s even gone as far as making cupcakes for her best friends wedding; red velvet cheesecake cupcakes to be exact.

998230_661831153829577_1435036772_n

The reason why I am emphasizing my little sister in this blog post is because recently we have been sharing one to two evenings throughout the week together when she stays over at my apartment so she can have a shorter commute to her new “big girl” job as a Registered Nurse at a Pediatric Clinic in the Twin Cities.  I love having my sister stay the night and it gives me an opportunity to try out new and creative recipes that maybe my boyfriend Blaine isn’t entirely crazy about trying out.

If you’re not living in Minnesota, you’re not missing out on the weather we just experienced yesterday and throughout the late night.  Due to this treacherous winter storm, my sister stayed the night at my apartment to make her commute a little less crazy.  Instead of me cooking and coming up the recipe and buying the ingredients, my little sister offered to step in and make dinner for Blaine and I.  Of course, I insisted on being the photographer and settled for being the Sou Chef for the evening. (Most people who know me, know it’s hard for me not to be the one mostly in charge of a situation, but I’m working on it!).

Ashley came across a recipe for sriracha salmon tacos with a honey slaw.  While in the process of her organizing this dinner, Ashley experienced her first trip to Whole Foods.  Later that evening, while we were cooking up a storm she told me: “When I walked into Whole Foods, it smelt like Grandma.”  She is referring to my Grandma Beverley who is a big supporter of organic foods and holistic health.  I agreed with Ashley because the one time I have been to Whole Foods, I thought the same thing.  (Love you Grandma!)

Alright, alright, I’ll stop being so sentimental and get to the recipe.  This recipe was originally taken from peasandcrayons.com. Of course I had to go and make it healthier and ask Ashley to pick up some fresh, organic romaine lettuce to use as a tortilla versus wasting my carbohydrates on refined white tortillas.  Yes, I could go with whole wheat tortillas, but I’d STILL rather save my calories for the protein part of the meal or even dessert!

Here’ it is, what you’ve all been waiting for!  Wait, you’re not a fish fan?  Well, you can use whatever protein you’d like for this recipe; that’s the beauty of cooking, you don’t have to be exact with your measurements or follow the recipe 100%, but baking, now that’s a science.  Ashley will be the first to tell you it’s not an easy getting your cupcakes to rise to the same height or trying to prevent them from sinking.

SEARED SALMON TACOS, HONEY SLAW, & SRIRACHA RANCH SAUCE

INGREDIENTS

  • Fresh salmon – we used 3 filets
  • 1 avocado
  • Whole romaine lettuce leaves
  • Olive oil
  • 1 Lime
  • Crumbled feta cheese, optional
  • Paprika
  • Red pepper flakes
  • Garlic or onion powder
  • salt and pepper
  • Whichever spices you’d like

SLAW

  • 1 + Cups cabbage, finely chopped
  • 1/4 small red onion, sliced thin
  • Honey, to taste – we used probably 2 tbsp
  • Cilantro, to taste
  • Lime juice, to taste
  • Garlic power, or whatever spices you’d like
  • Salt, to taste

SAUCE

  • 3 tbsp (LIGHT) ranch dressing
  • 1 tbsp sriracha chili sauce

DIRECTIONS

First preheat oven to 450 degrees fahrenheit for when it comes time to bake your salmon.

Combine all ingredients for slaw, mix, and place in refrigerator until served

photo 4photo 3

Once the slaw is finished, go a head and mix your sriracha ranch sauce together

Next, heat a large skillet to medium and rub the fresh salmon with olive oil and the spice blend of your choice.  I like to spray a little water in the pan to tell if it is warm enough.  If the water sizzles, then you know the pan is hot enough to start searing your salmon.  (While the salmon fillets are searing, line a baking sheet with tin foil and spray with non stick cooking spray.  Sear each side of the fillet for 2 minutes.  The middle will look pink when you are finished searing them.  Place the salmon fillets on the baking sheet and place in the oven for 5-10 minutes depending on the thickness of the fillets.

photo 1-2

While the salmon is baking, we took this opportunity to slice up avocado and wash the romaine lettuce leaves.  Of course we still had some tortillas, mostly for Blaine, but Ashley is still adjusting to switching over to the low carb side.

photo 2

Okay, so I haven’t convinced you to come over to the low carb side either yet?  Well, maybe this will –

1 Tortilla – 110 + calories

1 Romaine lettuce leaf – 5 calories

Think if you just subbed lettuce for your tortilla every other taco like my sister Ashley, you’d save over 100 calories each time!  All I ask is that you just think about it.

Alright, well we aren’t quite finished with the tacos yet.

Once the salmon is finished, split the fillets into sections to fit into the lettuce leaves or tortillas (I guess).  Top the salmon tacos with slaw, avocado slices, sriracha ranch sauce, crumbled feta cheese and lime juice to taste.

1798199_10201468497136044_1282383300_n

My sister and I had a great time making these tacos and Blaine even enjoyed them with tortillas!  I hope that you can start to challenge yourself with trying new, and healthier recipes.  You can replace almost any form of bread/tortilla with a lettuce wrap and it still tastes delicious.

I can guarantee that I will have many more recipes that come from nights my Ashley and I will spend together, maybe I will even throw in a cupcake recipe and see how I can make those healthier.

1234288_10200437416279667_126760079_n

Ashley and I this summer at her best friend’s wedding.

DID YOU EAT BREAKFAST THIS MORNING?

1621758_10201413282275707_1551719744_n

I’m sure you’ve heard over and over… and over again that breakfast is the most important meal of the day, but why don’t we all apply this? Is it because we’re too busy? Do we think cutting out breakfast will save us calories? Or are we just simply not hungry in the morning? The Huffington Post states that 31 million Americans skip breakfast daily.

Let’s say you do eat breakfast.   Have you now set yourself up for a successful, fuel-filled  day?  Maybe not.  The thing is, you can’t just eat something before lunch and call it breakfast.  Why not you ask?  I know the sequence of eating, yes: breakfast, lunch and dinner. What I’m trying to get at here is have you ever actually thought about the importance of what TIME you eat breakfast?  I know, you’re probably saying to yourself, “Yeah right, I barely have time to brush my teeth in the morning.”  Making an effort to eat within an hour of waking up.  Livestrong.com claims: “You are much more likely to over eat later in the day if you don’t have something within the first hours of daily activity.”  Therefore, just because it’s the first thing you eat during the day, doesn’t make it breakfast, let alone a “Nutritious” breakfast.

You may also be saying to yourself, “I’ve never eaten breakfast, so why should I start now?”  Even if you are healthy, active, and of “Normal” weight, eating breakfast daily can set you up for long-term healthy benefits.

BENEFITS OF EATING BREAKFAST

  • Increased energy throughout the day
  • Lower cholesterol levels
  • Improved performance, concentration, and energy throughout daily activities
  • Decreased hunger throughout the day
  • A more well-balanced diet, including increased vitamins and minerals
  • Associated with having a healthy weight or improved weight loss results

I can’t imagine that any of these benefits you would prefer not to have.  What I hope you get out of this blog post is an inspiration to attempt to eat breakfast, or a more nutritious breakfast than you typically do.  By no means do I suggest running to Perkins tomorrow for the tremendous twelve.

My next point is exactly the opposite of the Tremendous Twelve: just because you are eating “breakfast,” even within an hour or waking, doesn’t mean you are making the best choice, or will lose weight from “Eating breakfast.” For instance Calorie King claims that a Perkins Tremendous Twelve has 1500 calories in one order.  For many people, this is most or all of their calories allotted for the day.  So what do you do now?  Just not eat the rest of the day?  Well, not that’s not realistic.  A great option would be to choose something lower in calories and well-balanced with carbohydrates, protein, and even some healthy fats (i.e. peanut butter).  For example, choosing the Perkins Spinach and Baby Bella omelette is less than half the calories of the TT at 540 calories.  Now, if you ask for no bread, you save yourself more carbohydrates and calories!  Don’t get me wrong, I splurge every once and awhile on a delicious Perkins breakfast.  All I’m trying to say is enjoy these hefty breakfasts in moderation and chose wisely on your daily breakfast choices so that you CAN splurge every once and awhile.

What do I eat for breakfast then you ask?  I’ve been trying to really focus on my breakfast choices lately and make sure there is plenty of protein involved.  What I had for breakfast this morning was blueberry oatmeal and one over easy egg.  That’s not much protein you say?  Well, I make sure my oatmeal is homemade vs from a package.  I add my own vanilla protein powered to increase the protein within my breakfast, as well as add some flavor to the oatmeal.  I also add Splenda and SUGARFREE maple syrup to sweeten my oatmeal up.  Lastly, I top my oatmeal off with 1/4 cup blueberries and cinnamon.  This is something I eat nearly every morning, until I’m ready for something new.  Then I might go for a slice of lower calorie whole wheat peanut butter toast with a few scrambled eggs.

The common trend between my two examples of breakfast are that they are both pairing macronutrients and food groups: protein(meat) and carbohydrates(fruit and grains). (Macronutrients = carbohydrates, protein, fat).  By pairing your food groups, you can prevent spikes in your blood sugars.  Also, eating more protein within your meals will help you feel more full throughout the course of the day versus eating foods high in carbohydrates.  This is because our bodies main source of fuel is carbohydrates, therefore we burn through those carbohydrates quicker, leaving us hungrier sooner.

WORDS OF WISDOM:

  1. Eat breakfast within an hour of waking up.
  2. Incorporate more protein throughout your day, especially at breakfast!
  3. Pair your food groups – i.e. grains(carbs) with protein, fruits(carbs) with protein to make you feel more full throughout the day.
  4. Splurge every once in a while.  It’s important not to deprive yourself!

If you are looking for suggestions for what YOU can eat for breakfast that is quick and easy, let me know and I’d be glad do give you suggestions!

SOURCES USED:

http://www.webmd.com/diet/features/many-benefits-breakfast

http://www.jhsph.edu/offices-and-services/student-affairs/_documents/Breakfast

LET’S GO BOATING, SPAGHETTI SQUASH BOATING

Image

MORE MOC PASTA! I know my last blog was on zucchini pasta, but what can I say, I love me some noodles.  What I have here is a spaghetti squash lasagna boat.  I had never tried spaghetti squash before, but had recommended the vegetable as a pasta substitute for many of my clients.  After seeing quite a few recipes online utilizing spaghetti squash, I thought I should try it.

Every Monday night my sister stays over because she is currently commuting quite a ways for her new full-time job as a Registered Nurse at a Pediatric Clinic.  You should also know I live with my boyfriend Blaine currently and although he is a sweet guy and eats almost everything I prepare, he isn’t always as open to all of the recipes I test out.  Knowing this, I like to utilize the nights my sister is around to try out new and healthy recipes.  This past Monday I decided to try out spaghetti squash lasagna boats.  No I didn’t leave Blaine to fend for himself, I cooked him his own whole wheat pasta.  Let’s just say he’s a very lucky guy.

Alright, so let’s get these boats started.

You will need:

  • 1 large spaghetti squash
  • 1 lb ground turkey
  • 2 cans diced tomatoes, purred
  • 16 oz package of reduced fat mozzarella cheese
  • Fresh basil
  • Mrs. Dash, or seasoning of your choice
  • Salt and pepper to taste
  • Olive oil
  1. First preheat your oven to 350 degrees Fahrenheit.
  2. cut your spaghetti squash in half and clean out the seeds.  Once  your spaghetti squash is cleaned out, lightly coat the spaghetti squash with olive oil, salt, and pepper.  Place flat down on a baking sheet and bake for 30-40 minutes.
  3. While the spaghetti squash is baking, brown the ground turkey in a pan.
  4. Cut your fresh basil into ribbons by placing the leaves of basil flat on top of one another then rolling the leaves up.  (See picture)ImageImage
  5. Once the turkey is fully cooked, combine the two cans of diced tomatoes and some of the basil ribbons with the turkey.
  6. 16612_10201413552682467_1088131978_n-1
  7. After the spaghetti has baked for 30-40 minutes and is tender, take out of the oven and scrape the sides of the spaghetti squash to release the spaghetti like strands.  take out half of the squash from each spaghetti squash bowl and set aside.  unnamed-3
  8. Increase the oven temperature to 400 degrees Fahrenheit.
  9. Let’s start layering – on top of a layer of spaghetti squash spoon a layer of the turkey/tomato mixture followed by a layer of mozzarella.  I usually sprinkle Mrs. Dash and salt and pepper on top of the cheese layer.  Spoon some of the extra spaghetti squash that was set aside onto of the first lasagna layer.  This should fill the lasagna boat.
  10. Top the lasagna boat with basil ribbons.
  11. Last, but not least bake the spaghetti squash lasagna boats for 20 more minutes.

Image

After a few bites of this lasagna boats, I literally told my sister “I think I could live without pasta.”  This pasta substitute is amazing and can save you so many calories!

Try this yummy recipe out and let me know what you think!